

There’s something truly special about red velvet desserts — they’re vibrant, rich, and indulgent. Now, imagine taking that classic red velvet flavor and turning it into fluffy, gluten-free waffles. These Gluten-Free Red Velvet Waffles are a delicious twist on the traditional red velvet cake, making them perfect for brunch, special occasions, or whenever you want to treat yourself to something unique. With the perfect balance of cocoa and vanilla flavor, these waffles are light, tender, and packed with the iconic red hue. Topped with a dollop of whipped cream, syrup, or even cream cheese frosting, these waffles are sure to impress your guests or make a decadent breakfast for yourself. And best of all, they’re completely gluten-free, so everyone can enjoy them without worry. Let’s dive into this irresistible, colorful treat!

Why You’ll Love This Recipe
1. Gluten-Free and Delicious
These waffles are made with gluten-free flour, so they’re safe for those with gluten sensitivities, without compromising on flavor or texture. They’re just as fluffy and delicious as traditional waffles!
2. Vibrant Red Color
The striking red color of these waffles makes them perfect for special occasions like Valentine’s Day or Christmas. They add a fun and festive touch to your breakfast spread.
3. Soft and Fluffy Texture
Thanks to the combination of wet and dry ingredients, these waffles come out perfectly light and fluffy every time, creating a melt-in-your-mouth experience.
4. Versatile Toppings
You can top these waffles with anything from maple syrup to fresh berries or whipped cream, allowing for endless customization. For a truly indulgent treat, add a drizzle of cream cheese frosting.
5. Easy to Make
Making gluten-free waffles has never been easier. With simple ingredients and straightforward steps, this recipe is beginner-friendly and yields delicious results every time.
Ingredients
- Gluten-free all-purpose flour
- Cocoa powder
- Baking powder
- Salt
- Granulated sugar
- Eggs
- Buttermilk
- Milk (dairy or non-dairy)
- Red food coloring
- Vanilla extract
- Unsalted butter or dairy-free butter

Variations
- Dairy-Free Version: Use non-dairy milk (such as almond milk or oat milk) and dairy-free butter to make the waffles completely dairy-free.
- Vegan Version: Substitute the eggs with flax eggs (1 tablespoon ground flaxseed mixed with 3 tablespoons water) and use a plant-based milk and butter.
- Spiced Version: Add a pinch of cinnamon or nutmeg to the batter for a subtle warming spice that pairs beautifully with the red velvet flavor.
- Mini Waffles: For bite-sized treats, use a mini waffle maker to create smaller versions of these waffles for easy snacking or serving at parties.
How to Make the Recipe
Step 1: Preheat the Waffle Iron
Preheat your waffle iron according to the manufacturer’s instructions. Lightly grease it with cooking spray or a small amount of melted butter to ensure the waffles don’t stick.
Step 2: Prepare the Dry Ingredients
In a medium bowl, whisk together gluten-free all-purpose flour, cocoa powder, baking powder, and salt. Set aside.
Step 3: Prepare the Wet Ingredients
In a separate large bowl, beat the eggs until light and fluffy. Add the buttermilk, milk, vanilla extract, melted butter, and red food coloring, and whisk until combined.
Step 4: Combine the Wet and Dry Ingredients
Slowly add the dry ingredients into the wet ingredients, mixing until just combined. Be careful not to overmix, as this can affect the texture of the waffles.
Step 5: Cook the Waffles
Scoop the batter into the preheated waffle iron, using a ladle or measuring cup. Cook according to your waffle iron’s instructions until the waffles are golden brown and crisp on the outside, about 3-5 minutes.
Step 6: Serve and Enjoy
Remove the waffles from the waffle iron and serve immediately. Top with your favorite toppings such as whipped cream, maple syrup, or fresh berries. For an extra indulgent treat, drizzle with cream cheese frosting or sprinkle with powdered sugar.
Tips for Making the Recipe
- Do Not Overmix: When combining the wet and dry ingredients, be careful not to overmix the batter. Overmixing can lead to dense waffles, so mix just until combined.
- Adjust the Food Coloring: The amount of red food coloring can be adjusted based on your desired color intensity. You can use gel food coloring for a more vibrant hue.
- Rest the Batter: Let the batter rest for 5-10 minutes before cooking. This helps the gluten-free flour absorb the wet ingredients, resulting in fluffier waffles.
- Waffle Iron Size: Waffle irons come in different sizes, so be sure to adjust the amount of batter accordingly. If you have a mini waffle maker, you may need to use less batter per waffle.

How to Serve
These Gluten-Free Red Velvet Waffles are perfect for a decadent breakfast or brunch. Top with a dollop of whipped cream, drizzle with maple syrup, or add a few fresh berries for a light and refreshing contrast. If you’re craving something extra indulgent, spread a bit of cream cheese frosting on top, or sprinkle with powdered sugar for a classic finish. You can even serve these waffles as a dessert by pairing them with a scoop of vanilla ice cream or a drizzle of chocolate sauce.
Make Ahead and Storage
Storing Leftovers
Store any leftover waffles in an airtight container at room temperature for up to 2 days. To keep them fresh longer, refrigerate them for up to 5 days. Reheat in a toaster or microwave.
Freezing
These waffles freeze beautifully! Allow the waffles to cool completely, then place them in a single layer on a baking sheet and freeze for 1-2 hours. Once frozen, transfer them to a freezer-safe container or bag and store for up to 3 months. When you’re ready to eat, reheat in a toaster or oven for that freshly baked taste.
Reheating
To reheat frozen waffles, simply pop them in the toaster or bake them in the oven at 350°F (175°C) for 5-7 minutes or until heated through.
FAQs
1. Can I use regular flour instead of gluten-free flour?
Yes, if you’re not following a gluten-free diet, you can substitute regular all-purpose flour in this recipe. However, the texture and taste may differ slightly.
2. Can I make these waffles without red food coloring?
Yes, you can omit the food coloring if you prefer. The waffles will still taste delicious, but they won’t have the signature red color.
3. Can I make the batter ahead of time?
You can make the batter a day in advance and store it in the fridge. However, for best results, it’s recommended to make the waffles fresh to preserve their fluffy texture.
4. Can I add chocolate chips to the waffles?
Yes, adding chocolate chips to the batter would be a great idea for a more decadent waffle. Simply fold them into the batter before cooking.
5. How can I make these waffles dairy-free?
Use non-dairy milk (such as almond milk) and dairy-free butter. You can also use a dairy-free version of cream cheese if you want to add frosting.
6. Can I use a regular waffle iron instead of a mini waffle maker?
Yes, you can use any waffle iron you have. Just adjust the amount of batter based on the size of your iron, and follow the manufacturer’s instructions for cooking times.
7. Can I make these waffles vegan?
Yes, substitute the eggs with flax eggs (1 tablespoon ground flaxseed mixed with 3 tablespoons water) and use plant-based milk and butter for a vegan version.
8. What is the best way to store these waffles?
Store leftover waffles in an airtight container at room temperature for up to 2 days, or refrigerate them for up to 5 days. You can also freeze them for up to 3 months.
9. Can I use a different sweetener in the batter?
You can experiment with other sweeteners such as honey or maple syrup, but be sure to adjust the wet ingredients if necessary.
10. Can I top these waffles with cream cheese frosting?
Absolutely! Cream cheese frosting makes a perfect topping for these waffles, adding an extra layer of sweetness and tang.
Conclusion
These Gluten-Free Red Velvet Waffles are a fun, festive, and delicious way to enjoy a gluten-free breakfast or brunch. With their fluffy texture, rich cocoa flavor, and beautiful red color, they’re sure to be a hit at your next gathering or as a special treat for yourself. Whether you’re topping them with whipped cream, syrup, or even cream cheese frosting, these waffles will leave you craving more. Happy cooking!
Print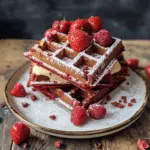
Gluten-Free Red Velvet Waffles
- Total Time: 15-20 minutes
- Yield: Makes approximately 4 waffles
- Diet: Gluten Free
Description
These soft and fluffy waffles are infused with cocoa powder and a hint of vanilla, achieving the classic red velvet flavor without gluten.
Ingredients
- 1¾ cups (254 g) gluten-free all-purpose flour
- 3 tablespoons sifted Dutch-processed cocoa powder
- 2 tablespoons granulated sugar
- 1 tablespoon plus 1 teaspoon gluten-free baking powder
- 1 teaspoon salt
- 1¼ cups (300 ml) lactose-free whole milk, at room temperature
- 2 large eggs, at room temperature
- 1 tablespoon red liquid or gel paste food coloring
- 1 teaspoon vanilla extract
- 1 teaspoon white vinegar
Instructions
- Preheat Waffle Iron: Preheat your waffle iron according to the manufacturer’s instructions.
- Mix Dry Ingredients: In a large bowl, whisk together the gluten-free flour, cocoa powder, sugar, baking powder, and salt.
- Combine Wet Ingredients: In a separate bowl, whisk together the milk, eggs, red food coloring, vanilla extract, and white vinegar until well combined.
- Combine Wet and Dry: Pour the wet ingredients into the dry ingredients and stir until just combined. Be careful not to overmix.
- Cook Waffles: Lightly grease the waffle iron and pour the batter onto the center. Close the lid and cook according to your waffle iron’s instructions, typically for about 3-5 minutes, until the waffles are golden brown.
- Serve: Carefully remove the waffles and serve immediately with your choice of toppings, such as fresh berries, whipped cream, or maple syrup.
Notes
- Ensure all your ingredients are gluten-free, especially the baking powder.
- For a dairy-free version, substitute the milk with a plant-based alternative and use a dairy-free butter substitute.
- The red color can vary depending on the type of food coloring used; gel paste food coloring often provides a more vibrant hue.
- Prep Time: 10 minutes
- Cook Time: 3-5 minutes per waffle
- Category: Breakfast
- Method: Waffle Iron
- Cuisine: American